
Ésta es la Parte 4 del tutorial paso a paso para desarrollar una aplicación web desde cero usando Spring Framework. En la Parte 1 hemos configurado el entorno y montado la aplicación básica. En la Parte 2 hemos mejorado la aplicación que habíamos construido hasta entonces. La Parte 3 añade toda la lógica de negocio y los tests unitarios. Ahora es el momento de construir la interface web para la aplicación.
Para empezar, renombramos el controlador HelloController a algo más descriptivo, como por ejemplo InventoryController, puesto que estamos construyendo un sistema de inventario. Aquí es donde un IDE con opción de refactorizar es de valor incalculable. Renombramos HelloController a InventoryController así como HelloControllerTests a InventoryControllerTests. A continuación, modificamos InventoryController para que almacene una referencia a la clase ProductManager. Anotaremos la referencia con @Autowired para que Spring la pueda inyectar automáticamente cuando detecte el componente. También añadimos código para permitir al controlador pasar la información sobre los productos a la vista. El método getModelAndView() ahora devuelve tanto un Map con la fecha y hora como una lista de productos.
'springapp/src/main/java/com/companyname/springapp/web/InventoryController.java':
package com.companyname.springapp.web;

import java.io.IOException;
import java.util.Date;
import java.util.HashMap;
import java.util.Map;

import javax.servlet.ServletException;
import javax.servlet.http.HttpServletRequest;
import javax.servlet.http.HttpServletResponse;

import org.apache.commons.logging.Log;
import org.apache.commons.logging.LogFactory;
import org.springframework.beans.factory.annotation.Autowired;
import org.springframework.stereotype.Controller;
import org.springframework.web.bind.annotation.RequestMapping;
import org.springframework.web.servlet.ModelAndView;

import com.companyname.springapp.service.ProductManager;

@Controller
public class InventoryController {

    protected final Log logger = LogFactory.getLog(getClass());

    @Autowired
    private ProductManager productManager;

    @RequestMapping(value="/hello.htm")
    public ModelAndView handleRequest(HttpServletRequest request, HttpServletResponse response)
            throws ServletException, IOException {

    	String now = (new Date()).toString();
        logger.info("Returning hello view with " + now);

        Map<String, Object> myModel = new HashMap<String, Object>();
        myModel.put("now", now);
        myModel.put("products", this.productManager.getProducts());

        return new ModelAndView("hello", "model", myModel);
    }


    public void setProductManager(ProductManager productManager) {
        this.productManager = productManager;
    }
}
Antes de que los test puedan ser pasados de nuevo, también necesitaremos modificar InventoryControllerTest para que proporcione un ProductManager y extraiga el valor de 'now' desde el modelo Map.
'springapp/src/test/java/com/companyname/springapp/web/InventoryControllerTests.java':
package com.companyname.springapp.web;

import java.util.Map;

import static org.junit.Assert.*;

import org.junit.Test;
import org.springframework.web.servlet.ModelAndView;

import com.companyname.springapp.service.SimpleProductManager;

public class InventoryControllerTests {

    @Test
    public void testHandleRequestView() throws Exception{
        InventoryController controller = new InventoryController();
        controller.setProductManager(new SimpleProductManager());
        ModelAndView modelAndView = controller.handleRequest(null, null);
        assertEquals("hello", modelAndView.getViewName());
        assertNotNull(modelAndView.getModel());
	@SuppressWarnings("unchecked")
        Map<String, Object> modelMap = (Map<String, Object>) modelAndView.getModel().get("model");
        String nowValue = (String) modelMap.get("now");
        assertNotNull(nowValue);
    }
}
Usando la etiqueta JSTL <c:forEach/>, añadimos una sección que muestra información de cada producto. También vamos a reemplazar el título, la cabecera y el texto de bienvenida con una etiqueta JSTL <fmt:message/> que extrae el texto a mostrar desde una ubicación 'message' – veremos esta ubicación un poco más adelante.
'springapp/src/main/webapp/WEB-INF/views/hello.jsp':
<%@ include file="/WEB-INF/views/include.jsp" %>

<html>
  <head><title><fmt:message key="title"/></title></head>
  <body>
    <h1><fmt:message key="heading"/></h1>
    <p><fmt:message key="greeting"/> <c:out value="${model.now}"/></p>
    <h3>Products</h3>
    <c:forEach items="${model.products}" var="prod">
      <c:out value="${prod.description}"/> <i>$<c:out value="${prod.price}"/></i><br><br>
    </c:forEach>
  </body>
</html>Es el momento de añadir un SimpleProductManager a nuestro archivo de configuración, el cual se inyectará automáticamente en el InventoryController. Todavía no vamos a añadir ningun código para cargar los objetos de negocio desde una base de datos. En su lugar, podemos reemplazarlos con unas cuantas instancias de la clase Product usando beans Spring en el fichero de configuració de la aplicación. Para ello, simplemente pondremos los datos que necesitamos en un puñado de entradas bean en el archivo 'app-config.xml'. También añadiremos el bean 'messageSource' que nos permitirá recuperar mensajes desde la ubicación 'messages.properties', que crearemos en el próximo paso.
'springapp/src/main/webapp/WEB-INF/spring/app-config.xml':
<?xml version="1.0" encoding="UTF-8"?>

<beans xmlns="http://www.springframework.org/schema/beans"
       xmlns:xsi="http://www.w3.org/2001/XMLSchema-instance"
       xmlns:context="http://www.springframework.org/schema/context"
       xmlns:mvc="http://www.springframework.org/schema/mvc"
       xsi:schemaLocation="http://www.springframework.org/schema/beans
       http://www.springframework.org/schema/beans/spring-beans.xsd
       http://www.springframework.org/schema/context
       http://www.springframework.org/schema/context/spring-context.xsd
       http://www.springframework.org/schema/mvc
       http://www.springframework.org/schema/mvc/spring-mvc.xsd">

       <bean id="productManager" class="com.companyname.springapp.service.SimpleProductManager">
         <property name="products">
            <list>
                <ref bean="product1"/>
                <ref bean="product2"/>
                <ref bean="product3"/>
            </list>
         </property>
       </bean>

       <bean id="product1" class="com.companyname.springapp.domain.Product">
         <property name="description" value="Lamp"/>
         <property name="price" value="5.75"/>
       </bean>

       <bean id="product2" class="com.companyname.springapp.domain.Product">
         <property name="description" value="Table"/>
         <property name="price" value="75.25"/>
       </bean>

       <bean id="product3" class="com.companyname.springapp.domain.Product">
         <property name="description" value="Chair"/>
         <property name="price" value="22.79"/>
       </bean>

       <bean id="messageSource" class="org.springframework.context.support.ResourceBundleMessageSource">
         <property name="basename" value="messages"/>
       </bean>

       <!-- Scans the classpath of this application for @Components to deploy as beans -->
       <context:component-scan base-package="com.companyname.springapp.web" />

       <!-- Configures the @Controller programming model -->
       <mvc:annotation-driven/>

       <bean id="viewResolver" class="org.springframework.web.servlet.view.InternalResourceViewResolver">
         <property name="viewClass" value="org.springframework.web.servlet.view.JstlView"></property>
         <property name="prefix" value="/WEB-INF/views/"></property>
         <property name="suffix" value=".jsp"></property>
       </bean>
</beans>Creamos un archivo llamado 'messages.properties' en el directorio 'src/main/webapp/WEB-INF/classes'. Este archivo de propiedades contiene tres entradas que coinciden con las claves especificadas en las etiquetas <fmt:message/> que hemos añadido a 'hello.jsp'.
'springapp/src/main/webapp/WEB-INF/classes/messages.properties':
title=SpringApp
heading=Hello :: SpringApp
greeting=Greetings, it is now
Si ahora compilamos y desplegamos de nuevo la aplicación en el servidor, deberíamos ver lo siguiente en el navegador:
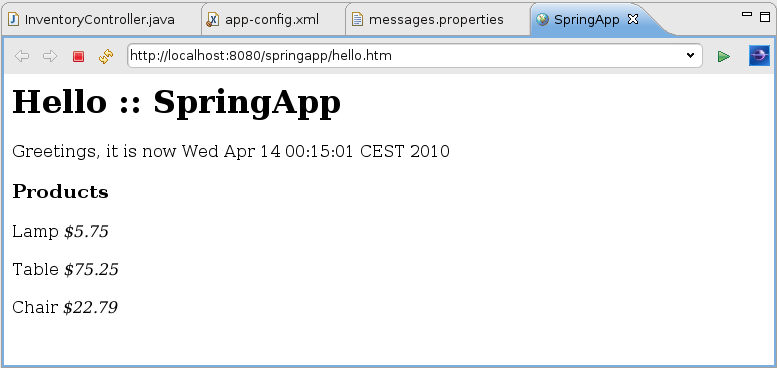
La aplicación actualizada
Para proveer de una interface a la aplicación web que muestre la funcionalidad para incrementar los precios, vamos a añadir un formulario que permitirá al usuario introducir un valor de porcentaje. Para ello, creamos el archivo JSP 'priceincrease.jsp' en el directorio 'src/main/webapp/WEB-INF/views'.
'springapp/src/main/webapp/WEB-INF/views/priceincrease.jsp':
<%@ include file="/WEB-INF/views/include.jsp" %>
<%@ taglib prefix="form" uri="http://www.springframework.org/tags/form" %>

<html>
<head>
  <title><fmt:message key="title"/></title>
  <style>
    .error { color: red; }
  </style>
</head>
<body>
<h1><fmt:message key="priceincrease.heading"/></h1>
<form:form method="post" commandName="priceIncrease">
  <table >
    <tr>
      <td align="right" width="20%">Increase (%):</td>
        <td width="20%">
          <form:input path="percentage"/>
        </td>
        <td width="60%">
          <form:errors path="percentage" cssClass="error"/>
        </td>
    </tr>
  </table>
  <br>
  <input type="submit" value="Execute">
</form:form>
<a href="<c:url value="hello.htm"/>">Home</a>
</body>
</html>
A continuación, debemos incluir las siguientes dependencias en el fichero 'pom.xml':
| Group Id | Artifact Id | Version |
|---|---|---|
| javax.validation | validation-api | 1.1.0.Final |
| org.hibernate | hibernate-validator | 5.2.4.Final |
| org.slf4j | slf4j-api | 1.7.21 |
| org.slf4j | slf4j-log4j12 | 1.7.21 |
Para configurar adecuadamente la librería log4j y evitar así algunos Warnings, recomendamos añadir (si no existiera) una nueva carpeta de recursos de tipo Source folder en nuestro proyecto, a la que llamaremos 'src/main/resources'. Dentro de esta carpeta crearemos los ficheros 'log4j.dtd' y 'log4j.xml' que se muestran a continuación:
'springapp/src/main/resources/log4j.dtd':
<?xml version="1.0" encoding="UTF-8" ?>

<!-- Authors: Chris Taylor, Ceki Gulcu. -->

<!-- Version: 1.2 -->

<!-- A configuration element consists of optional renderer
elements,appender elements, categories and an optional root
element. -->

<!ELEMENT log4j:configuration (renderer*, appender*,(category|logger)*,root?,
                               categoryFactory?)>

<!-- The "threshold" attribute takes a level value such that all -->
<!-- logging statements with a level equal or below this value are -->
<!-- disabled. -->

<!-- Setting the "debug" enable the printing of internal log4j logging   -->
<!-- statements.                                                         -->

<!-- By default, debug attribute is "null", meaning that we not do touch -->
<!-- internal log4j logging settings. The "null" value for the threshold -->
<!-- attribute can be misleading. The threshold field of a repository	 -->
<!-- cannot be set to null. The "null" value for the threshold attribute -->
<!-- simply means don't touch the threshold field, the threshold field   -->
<!-- keeps its old value.                                                -->

<!ATTLIST log4j:configuration
  xmlns:log4j              CDATA #FIXED "http://jakarta.apache.org/log4j/"
  threshold                (all|debug|info|warn|error|fatal|off|null) "null"
  debug                    (true|false|null)  "null"
>

<!-- renderer elements allow the user to customize the conversion of  -->
<!-- message objects to String.                                       -->

<!ELEMENT renderer EMPTY>
<!ATTLIST renderer
  renderedClass  CDATA #REQUIRED
  renderingClass CDATA #REQUIRED
>

<!-- Appenders must have a name and a class. -->
<!-- Appenders may contain an error handler, a layout, optional parameters -->
<!-- and filters. They may also reference (or include) other appenders. -->
<!ELEMENT appender (errorHandler?, param*, layout?, filter*, appender-ref*)>
<!ATTLIST appender
  name 		ID 	#REQUIRED
  class 	CDATA	#REQUIRED
>

<!ELEMENT layout (param*)>
<!ATTLIST layout
  class		CDATA	#REQUIRED
>

<!ELEMENT filter (param*)>
<!ATTLIST filter
  class		CDATA	#REQUIRED
>

<!-- ErrorHandlers can be of any class. They can admit any number of -->
<!-- parameters. -->

<!ELEMENT errorHandler (param*, root-ref?, logger-ref*,  appender-ref?)>
<!ATTLIST errorHandler
   class        CDATA   #REQUIRED
>

<!ELEMENT root-ref EMPTY>

<!ELEMENT logger-ref EMPTY>
<!ATTLIST logger-ref
  ref IDREF #REQUIRED
>

<!ELEMENT param EMPTY>
<!ATTLIST param
  name		CDATA   #REQUIRED
  value		CDATA	#REQUIRED
>

<!-- The priority class is org.apache.log4j.Level by default -->
<!ELEMENT priority (param*)>
<!ATTLIST priority
  class   CDATA	#IMPLIED
  value	  CDATA #REQUIRED
>

<!-- The level class is org.apache.log4j.Level by default -->
<!ELEMENT level (param*)>
<!ATTLIST level
  class   CDATA	#IMPLIED
  value	  CDATA #REQUIRED
>

<!-- If no level element is specified, then the configurator MUST not -->
<!-- touch the level of the named category. -->
<!ELEMENT category (param*,(priority|level)?,appender-ref*)>
<!ATTLIST category
  class         CDATA   #IMPLIED
  name		CDATA	#REQUIRED
  additivity	(true|false) "true"
>

<!-- If no level element is specified, then the configurator MUST not -->
<!-- touch the level of the named logger. -->
<!ELEMENT logger (level?,appender-ref*)>
<!ATTLIST logger
  name		ID	#REQUIRED
  additivity	(true|false) "true"
>

<!ELEMENT categoryFactory (param*)>
<!ATTLIST categoryFactory
   class        CDATA #REQUIRED>

<!ELEMENT appender-ref EMPTY>
<!ATTLIST appender-ref
  ref IDREF #REQUIRED
>

<!-- If no priority element is specified, then the configurator MUST not -->
<!-- touch the priority of root. -->
<!-- The root category always exists and cannot be subclassed. -->
<!ELEMENT root (param*, (priority|level)?, appender-ref*)>


<!-- ==================================================================== -->
<!--                       A logging event                                -->
<!-- ==================================================================== -->
<!ELEMENT log4j:eventSet (log4j:event*)>
<!ATTLIST log4j:eventSet
  xmlns:log4j             CDATA #FIXED "http://jakarta.apache.org/log4j/"
  version                (1.1|1.2) "1.2"
  includesLocationInfo   (true|false) "true"
>

<!ELEMENT log4j:event (log4j:message, log4j:NDC?, log4j:throwable?,
                       log4j:locationInfo?) >

<!-- The timestamp format is application dependent. -->
<!ATTLIST log4j:event
    logger     CDATA #REQUIRED
    level      CDATA #REQUIRED
    thread     CDATA #REQUIRED
    timestamp  CDATA #REQUIRED
>

<!ELEMENT log4j:message (#PCDATA)>
<!ELEMENT log4j:NDC (#PCDATA)>

<!ELEMENT log4j:throwable (#PCDATA)>

<!ELEMENT log4j:locationInfo EMPTY>
<!ATTLIST log4j:locationInfo
  class  CDATA	#REQUIRED
  method CDATA	#REQUIRED
  file   CDATA	#REQUIRED
  line   CDATA	#REQUIRED
>
'springapp/src/main/resources/log4j.xml':
<?xml version="1.0" encoding="UTF-8"?>
<!DOCTYPE log4j:configuration SYSTEM "log4j.dtd">

<log4j:configuration xmlns:log4j="http://jakarta.apache.org/log4j/">

	<!-- Appenders -->
	<appender name="console" class="org.apache.log4j.ConsoleAppender">
		<param name="Target" value="System.out" />
		<layout class="org.apache.log4j.PatternLayout">
			<param name="ConversionPattern" value="%-5p: %c - %m%n" />
		</layout>
	</appender>

	<!-- Application logger -->
	<logger name="springapp">
		<level value="info" />
	</logger>

	<!-- 3rdparty Loggers -->
	<logger name="org.springframework.beans">
		<level value="warn" />
	</logger>

	<logger name="org.springframework.jdbc">
		<level value="warn" />
	</logger>

	<logger name="org.springframework.transaction">
		<level value="warn" />
	</logger>

	<logger name="org.springframework.orm">
		<level value="warn" />
	</logger>

	<logger name="org.springframework.web">
		<level value="warn" />
	</logger>

	<logger name="org.springframework.webflow">
		<level value="warn" />
	</logger>

	<!-- Root Logger -->
	<root>
		<priority value="warn" />
		<appender-ref ref="console" />
	</root>

</log4j:configuration>
La siguiente clase que crearemos es un JavaBean muy sencillo que solamente contiene una propiedad, con sus correspondientes métodos getter y setter. Éste es el objeto que el formulario rellenará y desde el que nuestra lógica de negocio extraerá el porcentaje de incremento que queremos aplicar a los precios. La clase PriceIncrease utiliza las anotaciones @Min y @Max para definir el intervalo de valores válido para el incremento de precios del stock.
'springapp/src/main/java/com/companyname/springapp/service/PriceIncrease.java':
package com.companyname.springapp.service;

import javax.validation.constraints.Max;
import javax.validation.constraints.Min;

import org.apache.commons.logging.Log;
import org.apache.commons.logging.LogFactory;

public class PriceIncrease {

    /** Logger for this class and subclasses */
    protected final Log logger = LogFactory.getLog(getClass());

    @Min(0)
    @Max(50)
    private int percentage;

    public void setPercentage(int i) {
        percentage = i;
        logger.info("Percentage set to " + i);
    }

    public int getPercentage() {
        return percentage;
    }
}
A continuación, creamos la clase PriceIncreaseFormController que actuará como controlador de las peticiones de incremento de precio realizadas desde el formulario. Spring inyectará automáticamente al controlador del formulario la referencia al servicio ProductManager gracias a la anotació @Autowired. El método formBackingObject(..) será invocado antes de que el formulario se muestre al usuario (petición GET) y rellenará el campo con un incremento por defecto de un 15%. El método onSubmit(..) será invocado cuando el usuario envíe del formulario a través del método POST. El uso de la anotación @Valid permitirá validar el incremento introducido y volverá a mostrar el formulario en caso de que éste no sea válido.
'springapp/src/main/java/com/companyname/springapp/web/PriceIncreaseFormController.java':
package com.companyname.springapp.web;

import org.springframework.beans.factory.annotation.Autowired;
import org.springframework.stereotype.Controller;
import org.springframework.validation.BindingResult;
import org.springframework.web.bind.annotation.RequestMapping;
import org.springframework.web.bind.annotation.RequestMethod;

import javax.servlet.ServletException;
import javax.servlet.http.HttpServletRequest;
import javax.validation.Valid;

import org.apache.commons.logging.Log;
import org.apache.commons.logging.LogFactory;

import com.companyname.springapp.service.PriceIncrease;
import com.companyname.springapp.service.ProductManager;

@Controller
@RequestMapping(value="/priceincrease.htm")
public class PriceIncreaseFormController {

    /** Logger for this class and subclasses */
    protected final Log logger = LogFactory.getLog(getClass());

    @Autowired
    private ProductManager productManager;

    @RequestMapping(method = RequestMethod.POST)
    public String onSubmit(@Valid PriceIncrease priceIncrease, BindingResult result)
    {
        if (result.hasErrors()) {
            return "priceincrease";
        }

        int increase = priceIncrease.getPercentage();
        logger.info("Increasing prices by " + increase + "%.");

        productManager.increasePrice(increase);

        return "redirect:/hello.htm";
    }

    @RequestMapping(method = RequestMethod.GET)
    protected PriceIncrease formBackingObject(HttpServletRequest request) throws ServletException {
        PriceIncrease priceIncrease = new PriceIncrease();
        priceIncrease.setPercentage(15);
        return priceIncrease;
    }

    public void setProductManager(ProductManager productManager) {
        this.productManager = productManager;
    }

    public ProductManager getProductManager() {
        return productManager;
    }

}
Para mostrar los distintos mensajes de error, vamos a añadir también algunos mensajes al archivo de mensajes 'messages.properties'.
'springapp/src/main/webapp/WEB-INF/classes/messages.properties':
title=SpringApp
heading=Hello :: SpringApp
greeting=Greetings, it is now
priceincrease.heading=Price Increase :: SpringApp
error.not-specified=Percentage not specified!!!
error.too-low=You have to specify a percentage higher than {0}!
error.too-high=Don''t be greedy - you can''t raise prices by more than {0}%!
required=Entry required.
typeMismatch=Invalid data.
typeMismatch.percentage=That is not a number!!!
Finalmente, vamos a añadir un enlace a la página de incremento de precio desde 'hello.jsp'.
<%@ include file="/WEB-INF/views/include.jsp" %>

<html>
  <head><title><fmt:message key="title"/></title></head>
  <body>
    <h1><fmt:message key="heading"/></h1>
    <p><fmt:message key="greeting"/> <c:out value="${model.now}"/></p>
    <h3>Products</h3>
    <c:forEach items="${model.products}" var="prod">
      <c:out value="${prod.description}"/> <i>$<c:out value="${prod.price}"/></i><br><br>
    </c:forEach>
    <br>
    <a href="<c:url value="priceincrease.htm"/>">Increase Prices</a>
    <br>
  </body>
</html>
Compila, despliega y después de recargar la aplicación podemos probarla. El formulario mostrará los errores siempre que no se introduzca un valor válido de porcentaje.

La aplicación actualizada
Vamos a ver lo que hemos hecho en la Parte 4.
Hemos renombrado nuestro controlador a InventoryController y le hemos dado una referencia a ProductManager por lo que ahora podemos recuperar una lista de productos para mostrar.
Entonces hemos definido algunos datos de prueba para rellenar objetos de negocio.
A continuación hemos modificado la página JSP para usar una ubicación de mensajes y hemos añadido un loop forEach para mostrar una lista dinámica de productos.
Después hemos creado un formulario para disponer de la capacidad de incrementar los precios.
Finalmente hemos creado un controlador de formulario que valida los datos introducidos, hemos desplegado y probado las nuevas características.
A continuación puedes ver una captura de pantalla que muestra el aspecto que debería tener la estructura de directorios del proyecto después de seguir todas las instrucciones anteriores.
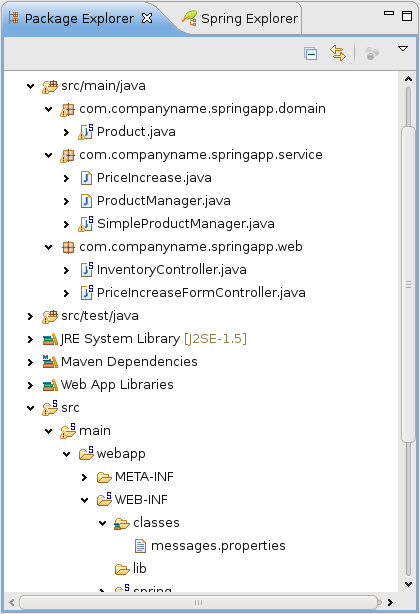
La estructura de directorios del proyecto al final de la parte 4