There are two ways to include images (graphics) in an HTML document: inline and external. You'll usually use inline images, which appear directly in the HTML page. External images are downloaded when a user clicks a link to the image.
Some browsers can read a wide variety of types of image files, but some can read only a few. The most commonly readable format is .GIF files. There are lots of shareware products that create .GIFs or translate one type of image (for example .BMP) to .GIF. JPEG image files are usually better for photographic images, or images with a lot of detail. GIF images can be better for images with large expanses of solid color.
To include an image in your HTML document, use the <IMG> tag.
The previous line includes the file some.gif in your HTML document. This assumes that the file is in the same directory as your HTML document. If the file is in another directory, use either the relative or absolute path.
You can include images on separate lines, or you can include them in text in headings, body paragraphs, and even lists.
The image tag has several attributes that control the graphic. The first is SRC. This defines the source for the graphic--the .GIF image file.
You can control where the image is positioned relative to the text of the line it appears in by using the ALIGN attribute. You can set ALIGN to one of nine different values: LEFT, RIGHT, TOP, ABSMIDDLE, ABSBOTTOM, TEXTTOP, MIDDLE, BASELINE, or BOTTOM. If you don't specify alignment, it defaults to BOTTOM.
Three of the ways to align images. ![]()
Some browsers can't display images. You can include a text string that describes the image by using the ALT attribute.
The following example displays an image and includes the descriptive text for browsers that can't display images:
<IMG SRC="icon.gif" ALT="This is my icon">
The following example shows a series of text blocks with images aligned according to many of the alignment options offered by Navigator:
<hr>

text around <img src=red_ball.gif width=18 height=18> the image.

<hr>

<b>top</b> text around

<img src=red_ball.gif align=top width=18 height=18>

the image.

<hr>

<b>absmiddle</b> text around

<img src=red_ball.gif align=absmiddle width=18 height=18>

the image.

<hr>

<b>absbottom</b> text around

<img src=red_ball.gif align=absbottom width=18 height=18>

the image.

<hr>

<b>baseline</b> text around

<img src=red_ball.gif align=baseline width=18 height=18>

the image.

<hr>

<b>left</b> text around

<img src=red_ball.gif align=left width=18 height=18>

the image.

Oh, if only we could make the text flow around an image.  We could do

such great formatting if we had the capability to let text flow around

images of all kinds: photos of animals, plants, buildings, and people,

or simple line drawings of various helpful sorts.

<br clear=all>

<hr>

<b>right</b> text around

<img src=red_ball.gif  align=right  width=18 height=18></applet>

the image.

Oh, if only we could make the text flow around an image.  We could do

such great formatting if we had the capability to let text flow around

images of all kinds: photos of animals, plants, buildings, and people,

or simple line drawings of various helpful sorts.

<br clear=all>

<hr>
You can use graphics as links to other pages by embedding the image tag in a link. The following example adds a circle graphic and links it to the HTML document called circles.
<A HREF="circles.html"><IMG SRC="circle.gif"></A>
You can combine graphics and text in one link. This means that you can click either the graphic or the text to jump to the corresponding page:
<A HREF="icons.html"><IMG SRC="myicon.gif">My icon is cool</A>
Interlacing is a feature of the GIF file format that lets a viewer or browser display a file with progressively greater detail in four successive passes. When Navigator loads an interlaced GIF, the first pass starts at row 0 and displays every eighth row of bitmap data; the second pass starts at row 4 and also displays every eighth row. Similarly, the third and fourth passes load progressively more data in a non-linear fashion until the full image is loaded.
When Navigator loads an interlaced GIF, the image appears to gradually fade in. When 50% of an interlaced GIF is loaded, a user can interpret the image because every fourth row of data is visible. When Navigator loads a non-interlaced GIF, each row of data is loaded sequentially. When 50% of a non-interlaced GIF is loaded, only the top half of the image is visible.
Navigator and most other browsers that support the GIF format support interlaced GIFs. Third-party tools are available on the Internet to let you convert a non-interlaced GIF to the interlaced format.
An image map is a graphic that has clickable regions that link to different pages. For example, you can have an image with a square and a circle where a click in the square takes you to one page and a click in the circle takes you to a different page.
Different areas of an image map can jump to
different Web pages. 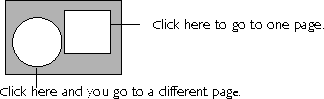
HTML provides two forms of image maps:
Defining a client-side image map is a two-step process:
Defining a server-side image map is a two-step process:
When a user clicks a region of a server-side image map, the browser sends the coordinates of the click to the server. The imagemap program on the server uses the coordinates and a database to determine the URL to load.
To create a server-side image map, place an IMG tag within a link, and use the ISMAP attribute of the IMG tag to specify that the image is a server-side image map. For example , to include an image called logo.gif as a server-side image, use the following lines in your HTML file (and make sure the logo.gif file is in the same directory):
<A HREF="http://www.homepage.com/images/logo.map">

<IMG SRC="logo.gif" ISMAP>

</A>
For client-side images, use the SHAPE attribute to specify any of the following shapes for the region defined by the AREA tag:
Figure 2.3 shows the different shapes a map region can have.
Defining regions in an image 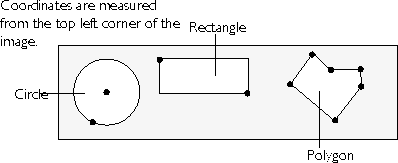 map
map
If you do not specify the SHAPE attribute, Navigator uses "rect" as the default value.
Use the COORDS attribute to specify the coordinates of the region defined by the AREA tag. Coordinates vary according to the value of the SHAPE attribute:
Coordinates are specified in a 0-based system. For example, in a region that is 100 pixels high and 100 pixels wide, the coordinates of the top left corner are 0,0 and the coordinates of the lower right corner are 99,99.
Some third-party tools are available on the Internet to let you visually specify the coordinates for a map region.
When a region defined by one AREA tag intersects another, the region that is defined first in the map definition takes precedence in the overlapping region.
For server-side images, you create an ASCII text file with the .map extension that contains the coordinates for the areas you want to link. Coordinates are specified from the upper left corner of the image. There are several good imaging applications that will give you the coordinates for a point in an image.
Each line in the map file specifies a clickable region. Lines have the format:
method URL coordinate1 coordinate2
Method defines the shape the coordinates specify. Methods can be:
The following text is a sample map file. Lines beginning with # are comment lines that are ignored by the server.
# sample map file image

# This is the top left circle

circle http://www.netscape.com/funstuff 37,39 32,62

# This is the rectangle in the middle

rect http://www.netscape.com/fabulous 75,7 150,39

# This is the point

point http://www.netscape.com/homepage 125,62

# This is that weird polygon

poly http://w3.netscape.com/ 175,35 190,5 200,10 220,9 219,37 203,62
When a user clicks the map region, Navigator displays the page specified by the URL in the HREF attribute.
For server-side images, the destination URLs appear in the .map file. However, for client-side images, the URLs appear in the AREA tags in the HTML file. This section describes how to specify URLs for client-side images.
Eric Bina says we do not support putting MAP and IMG in separate files.
If the MAP tag and its related IMG tag are in different files and you specify a relative URL for the HREF attribute, the full URL for HREF is constructed using the URL of the document that contains the MAP tag as a reference. If the document that contains MAP uses a BASE tag, the full URL for HREF is constructed by using the BASE HREF value as a reference.
Any region of an image that does not have an HREF attribute does not function as a hyperlink. If you explicitly want to prevent a region from functioning as a hyperlink, specify the NOHREF attribute.
Use the TARGET attribute to specify the name of the window or frame that displays the destination URL. If you do not specify a TARGET attribute, Navigator displays the destination URL in the current window or frame.
Example 1: a client-side image map as a toolbar
In this example, an image map is used as a toolbar
to help users navigate in a web site. The following illustration shows
what the finished image map looks like to a user: 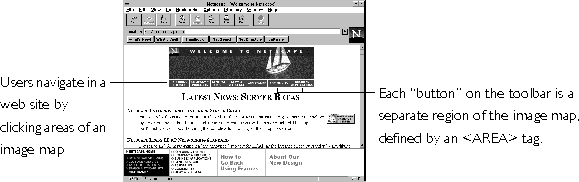
Each button on the toolbar is a separate region of the image map. The seven buttons correspond to regions defined by seven AREA tags. The following code defines the map:
<MAP NAME="mainmap">

          <AREA COORDS="0,0,65,24" HREF="/escapes/index.html">

          <AREA COORDS="66,0,132,24" HREF="/comprod/index.html">

          <AREA COORDS="133,0,185,24"

                    HREF="http://merchant.netscape.com/netstore/index.html"

                    TARGET="_top">

          <AREA COORDS="186,0,248,24" HREF="/newsref/index.html">

          <AREA COORDS="249,0,318,24" HREF="/assist/index.html">

          <AREA COORDS="319,0,390,24" HREF="/commun/index.html">

          <AREA COORDS="391,0,467,24" HREF="/business_solutions/index.html">

</MAP>
Because no SHAPE attribute is specified for any AREA tag, the shape of each region defaults to a rectangle. The third AREA tag uses the "_top" value for its TARGET attribute to specify that its URL is loaded into the full Navigator window.
The image used for the toolbar is nav.gif, an interlaced GIF. The IMG tag that loads nav.gif uses the USEMAP attribute to specify that the image is a client-side image map. The value of the USEMAP attribute, mainmap, is also the value used for the NAME attribute of the MAP tag. The following code associates the map with the image:
<IMG SRC="nav.gif"

          WIDTH=468 HEIGHT=25 BORDER=0

          USEMAP="#mainmap">
Example 2: server-side image map
In this example, the image file logo.gif is treated as a server-side image map because it is loaded with the ISMAP attribute. The IMG tag is implemented within a link. When a user clicks the link, the coordinates of the click are passed to the imagemap program in the server's cgi-bin directory. The file map_logo.map is a file on the server that contains coordinate information about the image logo.gif. The file name map_logo.map is passed as a parameter to the imagemap program.
<A HREF="http://www.homeworld.com/cgi-bin/imagemap/map_logo.map">

                    <IMG SRC="http://www/homeworld.com/logo.gif" ISMAP>

</A>
Example 3: combined server-side and client-side image maps
In this example, the USEMAP and ISMAP attributes of the IMG tag are both specified, so the image can be processed as either a client-side image map or a server-side image map. The USEMAP attribute has priority. If the browser that accesses the page supports client-side image maps, then the image is processed as a client-side map; otherwise, the image is processed as a server-side map.
<A HREF="http://www.homeworld.com/cgi-bin/imagemap/map_logo.map">

                    <IMG SRC="logo.gif" ISMAP USEMAP="maps.html#LogoMap">

</A>