[prev] [next] [top]
[bottom] (1
out of 1)
H1 through H6 (standard headings)
INPUT (create input elements in a form)
ISINDEX (indicate presence of searchable index)
KEYGEN (generate key material)
MAP (define client-side image map)
META (meta-document information)
The FRAMESET tag defines a group of frames that appear in a single Netscape Navigator window. You define and specify the features of the group of frames by using the following tags nested within the FRAMESET tag:
The only place the FRAMESET tag is used is in a frame definition document. A frame definition document is an HTML document that contains the layout for each frame and frameset that make up a Navigator window. An HTML document that contains a FRAMESET tag cannot contain a BODY tag.
<FRAMESET
BORDER="pixWidth"
BORDERCOLOR="color"
COLS="ColumnWidthList" Either
COLS or ROWS is required
FRAMEBORDER="YES"|"NO"
ONBLUR="blurJScode"
ONFOCUS="focusJScode"
ONLOAD="loadJScode"
ONUNLOAD="unloadJScode"
ROWS="RowHeightList" Either
COLS or ROWS is required
>
...
</FRAMESET>
BORDER="pixWidth"specifies the thickness of frame borders for all frames in a frameset. A setting of BORDER="0" causes all frames in the frameset to have no border between them. A setting of BORDER="3" causes a border of 3 pixels. If no BORDER tag is present, the default is 5 pixels. The BORDER tag can be used only on an outermost FRAMESET tag. Navigator 3.0
BORDERCOLOR="color" specifies the color of a frame's borders. The value of color is a hexadecimal red-green-blue triplet, or a color name. See Appendix B, "Color values."Navigator 3.0
Because frame borders are shared, Navigator must resolve any border color conflicts.
If there is a conflict for two colors of equal priority both set on the same edge, the behavior is undefined.
COLS="ColumnWidthList" specifies a comma-separated list of values giving the width of each frame in the frameset. If one of the values is missing, the corresponding frame is sized to fit by the browser. The browser can approximate some values to make the total height of the rows equal to the height of the window or the total width of the columns equal to the width of the window. ColumnWidthList can be:
FRAMEBORDER determines how frame borders are displayed.Navigator 3.0
When FRAMEBORDER appears in the FRAMESET tag, it sets a default FRAMEBORDER value for all frames in that frameset. When FRAMEBORDER appears in a FRAME tag, it applies only to that particular frame, overriding any FRAMEBORDER established by an outer FRAMESET tag. A border shared between frames is plain only if all adjacent frames have the FRAMEBORDER attribute set to NO. When neither a FRAME nor a FRAMESET governing that FRAME has set FRAMEBORDER, the default setting is YES.
ONBLUR="blurJScode" specifies JavaScript code to execute when the window containing the frameset loses focus. See the JavaScript Guide for information on event handlers.Navigator 3.0
ONFOCUS="focusJScode" specifies JavaScript code to execute when the window containing the frameset loses focus. See the JavaScript Guide for information on event handlers.Navigator 3.0
ONLOAD="loadJScode" specifies JavaScript code to execute when the frameset is loaded into the frame. See the JavaScript Guide for information on event handlers.
ONUNLOAD="unloadJScode" specifies JavaScript code to execute when the frameset is unloaded (exited). See the JavaScript Guide for information on event handlers.
ROWS="RowHeightList" specifies a comma-separated list of values giving the height of each frame in the frameset. If one of the values is missing, the corresponding frame is sized to fit by the browser. The browser can approximate some values to make the total height of the rows equal to the height of the window or the total width of the columns equal to the width of the window. RowHeightList can be:
Example 1: frameset with two frames
The following example creates a set of two frames. The frameset is kept in a separate document file, such as index.html, that contains no other information. When users navigate to the file, index.html is loaded, and the FRAMESET tag within index.html then loads the individual URLS referenced in the FRAME tag.
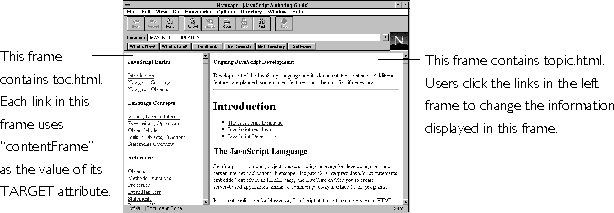
<FRAMESET COLS="30%,70%">

   <FRAME SRC="toc.html" NAME="listFrame">

   <FRAME SRC="topic.html" NAME="contentFrame">

</FRAMESET>
The two frames appear as columns because COLS is specified within the FRAMESET tag. The left frame uses 30% of the available space, and the right frame uses the remaining 70% of the space. By default, the frames in this example have scroll bars and are resizable, because no values are specified for the SCROLLING and NORESIZE attributes.
The code in this example creates a set of frames
similar to the following:
The frameset described in this example acts as a table of contents. The table of contents entries in the left frame are always available to the user. When users click a link in the left frame, the right frame navigates to the chosen topic. Each link in the left frame (the toc.html document file) uses "contentFrame" as the value of its TARGET attribute, which forces the right frame to display the target text.
The following example creates a frameset that contains a nested frameset.
<FRAMESET ROWS="90%,10%">

   <FRAMESET COLS="30%,70%">

      <FRAME SRC="category.html" NAME="listFrame">

      <FRAME SRC="titles.html" NAME="contentFrame">

   </FRAMESET>

   <FRAME SRC="navigate.html" NAME="navigateFrame">

</FRAMESET>
The code in this example creates two sets of frames
similar to the following: 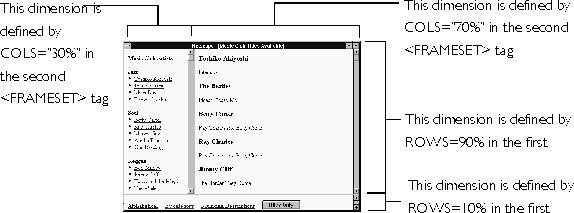
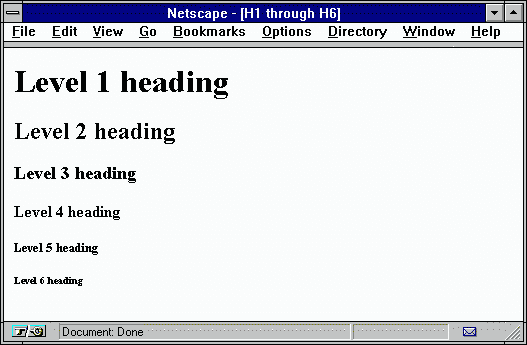
HTML has six levels of headings, numbered 1 through 6, with 1 being the most prominent. Headings are displayed in different fonts (larger and bold) than normal body text.
<H1 ALIGN="LEFT"|"CENTER"|"RIGHT">...</H1>
<H2 ALIGN="LEFT"|"CENTER"|"RIGHT">...</H2>
<H3 ALIGN="LEFT"|"CENTER"|"RIGHT">...</H3>
<H4 ALIGN="LEFT"|"CENTER"|"RIGHT">...</H4>
<H5 ALIGN="LEFT"|"CENTER"|"RIGHT">...</H5>
<H6 ALIGN="LEFT"|"CENTER"|"RIGHT">...</H6>
ALIGN specifies the horizontal alignment of the heading. The value can be:
The following example demonstrates the use of the H1 through H6 tags.
<H1>Level 1 heading</H1>

<H2>Level 2 heading</H2>

<H3>Level 3 heading</H3>

<H4>Level 4 heading</H4>

<H5>Level 5 heading</H5>

<H6>Level 6 heading</H6>
The HEAD tag defines the HTML document header. The header contains information about the document, and can be used to define JavaScript functions to be used in the document. None of the information in the HEAD tag is displayed by the Web browser, except for text contained by the TITLE tag. You should be careful not to put any of your document content (other than JavaScript) in the HEAD tag.
The tags that can occur in a header are <BASE>, <ISINDEX>, <META>, <SCRIPT>, and <TITLE>.
<HEAD>

<TITLE> Mozilla speaks out</TITLE>

<BASE HREF="http://www.mozilla.com">

</HEAD>
The HR tag draws a horizontal line across the document frame or window. You can use a horizontal line to visually divide information or sections. The HR tag doesn't require a closing tag.
<HR
ALIGN="CENTER"|"LEFT"|"RIGHT"
NOSHADE
SIZE="pixThick"
WIDTH="value"
>
ALIGN specifies the horizontal alignment of lines that do not span the width of the page. Navigator 1.1
NOSHADE removes any line shading, producing a solid black line. Navigator 1.1
SIZE="pixThick" indicates the thickness of the line in pixels. The default is 2 pixels. Navigator 1.1
WIDTH="pixPct" defines the horizontal width of the line. The default is the width of the page. The measurement value can be a number of pixels or a percentage of the page width or frame width. Navigator 1.1
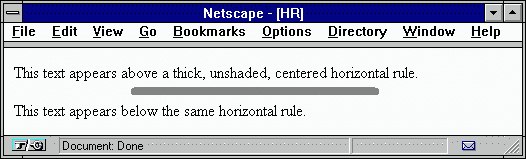
The following example draws a horizontal rule between two sentences.
This text appears above a thick, unshaded, centered horizontal rule.

<HR NOSHADE ALIGN="CENTER" WIDTH="50%" SIZE="8">

This text appears below the same horizontal rule.
The HTML tag identifies your document as an HTML document. These tags should be the first and last tags in any HTML document. This lets the client render the contents of your document correctly.
The following example begins and ends a short document with the HTML tag.
<HTML>

<BODY>

This is a small HTML file.

</BODY>

</HTML>
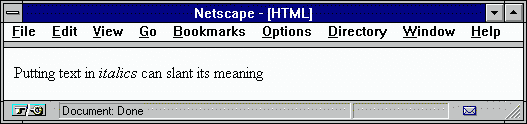
The I tag displays text in italic.
The following example displays "italics" in italics.
Putting text in <I> italics </I> can slant its meaning
The IMG tag specifies an image to include in an HTML document. Navigator supports the following types of image formats:
<IMG
ALIGN="LEFT"|"RIGHT"|"TOP"|"ABSMIDDLE"|"ABSBOTTOM"|
"TEXTTOP"|"MIDDLE"|"BASELINE"|"BOTTOM"
ALT="AlternateText"
BORDER="pixBorder"
HEIGHT="height"
HSPACE="pixHorzMarg"
ISMAP
LOWSRC="Location"
NAME="imgName"
ONABORT="imgLoadJScode"
ONERROR="errorJScode"
ONLOAD="imgLoadJScode"
SRC="Location" required
USEMAP="Location#MapName"
VSPACE="pixVertMarg"
WIDTH="width"
>
ALIGN specifies the alignment of the image in relation to the surrounding text. If you do not specify a value for ALIGN, Navigator uses "BOTTOM" as the default.Navigator 1.1
ALT="AlternateText" specifies the simple text that a browser should display if it does not support the IMG tag, or if the user has suspended image loading.
BORDER="value" specifies the width, in pixels, of an image border. Navigator 1.1
HEIGHT="pixels"|"value%" specifies the height of the image either in pixels or as a percentage of the window height. Navigator 1.1
HSPACE="value" specifies a margin in pixels between the left and right edges of the image and surrounding text and images. Navigator 1.1
ISMAP specifies the image as a server-side image map.
LOWSRC="Location" specifies the URL of a low-resolution version of the image.
NAME="imgName" specifies a name by which JavaScript can refer to the image.
ONABORT="imgAbortJScode" specifies JavaScript code to execute when the user terminates the loading of an image. See the JavaScript Guide for information on event handlers.
ONERROR="errorJScode" specifies the JavaScript code to execute when the JavaScript encounters an error. See the JavaScript Guide for information on event handlers.
ONLOAD="imgLoadJScode" specifies the JavaScript event handler to execute when the image is loaded. See the JavaScript Guide for information on event handlers.
SRC="Location" specifies the URL of the image to be displayed in the document.
USEMAP="Location#MapName" specifies the image as a client-side image map. You must specify the URL of the file that contains the map definition, followed by a # symbol, and then the name of the map.
VSPACE="value" specifies a margin in pixels between the top and bottom edges of the image and surrounding text and images.Navigator 1.1
WIDTH="pixels"|"value%" specifies the width of the image either in pixels or as a percentage of the window width.Navigator 1.1
The following example uses all the IMG attributes to improve performance:
<IMG SRC="http://www.HomeWorld.com/logo.gif"

          LOWSRC="http://www.HomeWorld.com/lowlogo.jpg"

          ALT="Welcome to Netscape" WIDTH="468" HEIGHT="25"

                    BORDER="0">
This example uses the following attributes to improve performance:
Example 2: text wrapping around an image
In this example, an image is aligned on the right
side of the Navigator window, and text flows around it to the left: 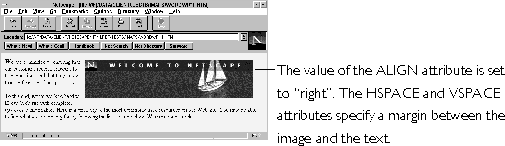
The following HTML code creates the image alignment and text wrap shown in the previous illustration:
<IMG SRC="logo.jpg"

          ALIGN="right" ALT="Welcome to Netscape"

          HSPACE="10" VSPACE="5">


<BIG><B>W</B></BIG>e are committed to ensuring that our customers
receive answers to their questions and that they enjoy trouble-free use
of our products.<P>
In this example, the HSPACE attribute creates a 10-pixel margin below the image, and the VSPACE attribute creates a 5-pixel margin to the left.
The INPUT tag lets you create input fields inside a form. An input field lets the user enter information on an HTML form. The TYPE attribute determines the specific sort of form element to be created:
In addition to the fields defined using INPUT, two types of input fields--selection lists and textarea elements--are defined using the SELECT and TEXTAREA tags.
<INPUT TYPE="BUTTON"
NAME="buttonName" required
VALUE="buttonText"
ONCLICK="JScode"
>
NAME="buttonName" specifies the name of the input element. This value is the name portion of the name=value pair sent to the server when the form is submitted. The name is not displayed on the form.
ONCLICK="JScode" specifies JavaScript code to execute when a user clicks the button. See the JavaScript Guide for information on event handlers.
VALUE="buttonText" specifies the text to be displayed on the button.
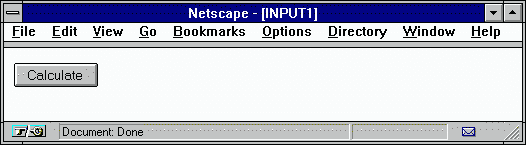
The following example is a JavaScript example that creates a button named CalcButton. The text "Calculate" is displayed on the face of the button. When the button is clicked, the function CalcFunction() is called.
<FORM>

<INPUT TYPE="button" VALUE="Calculate" NAME="CalcButton"

                    onClick="CalcFunction(this.form)">

</FORM>
<INPUT TYPE="CHECKBOX"
CHECKED
NAME="checkboxName" required
ONCLICK="JScode"
VALUE="checkboxValue"
>
textToDisplay
CHECKED indicates that the checkbox is selected.
NAME="checkboxName" specifies the name of the input element. This value is the name portion of the name=value pair sent to the server when the form is submitted. The name is not displayed on the form.
ONCLICK="clickJScode" specifies JavaScript code to execute when a user clicks the checkbox. See the JavaScript Guide for information on event handlers.
textToDisplay specifies the label to display next to the checkbox.
VALUE="checkboxValue" specifies the value to be returned to the server when the checkbox is selected and the form is submitted. The default value is ON.
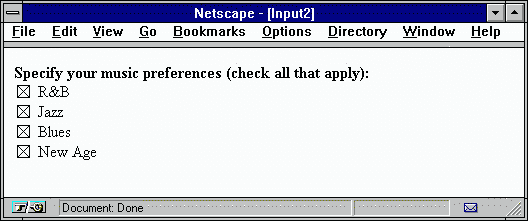
The following example displays a group of four checkbooks that all appear checked by default.
<FORM>

<B>Specify your music preferences (check all that apply):</B>

<BR><INPUT TYPE="checkbox" NAME="musicpref_rnb" CHECKED> R&B

<BR><INPUT TYPE="checkbox" NAME="musicpref_jazz" CHECKED> Jazz

<BR><INPUT TYPE="checkbox" NAME="musicpref_blues" CHECKED> Blues

<BR><INPUT TYPE="checkbox" NAME="musicpref_newage" CHECKED> New Age

</FORM>
<INPUT TYPE="FILE"
NAME="name" required
VALUE="value"
>
NAME="name" specifies the name of the input element. This value is the name portion of the name=value pair sent to the server when the form is submitted. The name is not displayed on the form.
VALUE="value" specifies the initial value of the input element.
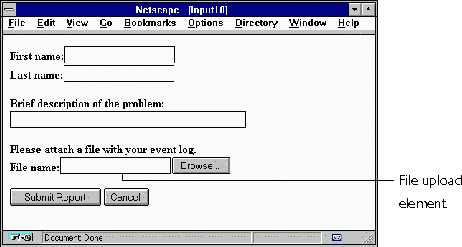
The following example creates a file upload element.
<FORM ENCTYPE="multipart/form-data" ACTION="_URL_" METHOD="POST">

<B>First name:</B><INPUT TYPE="text">

<BR><B>Last name:</B><INPUT TYPE="text">

<P><B>Brief description of the problem:</B>

<BR><INPUT TYPE="text" SIZE="45">

<P><B>Please attach a file with your event log.</B>

<BR><B>File name:</B><INPUT TYPE="file">

<P><INPUT TYPE="submit" VALUE="Submit Report">

<INPUT TYPE="button" VALUE="Cancel" onClick="window.close()">

</FORM>
<INPUT TYPE="HIDDEN"
NAME="hiddenName" required
VALUE="hiddenValue"
>
NAME="hiddenName" specifies the name of the input element. This value is the name portion of the name=value pair sent to the server when the form is submitted. The name is not displayed on the form. This tag provides a mechanism for delivering a value to the server without the user having entered it, but note that it is not very "hidden" because the user can discover it by using the View|Document Source sequence.
VALUE="hiddenValue" specifies the initial value of the input element.
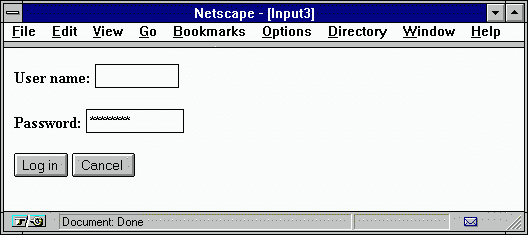
This example creates a form called LoginForm that contains text fields for user name and password, a submit button with the text "Log in" displayed on its face, and a cancel button. A hidden element, DefaultPass, stores the initial value of the password field.
<FORM NAME="LoginForm">

<B>User name:</B>

<INPUT TYPE="text" NAME="userName" SIZE="10">

<P><B>Password:</B>

<INPUT TYPE="password" NAME="password" SIZE="12" VALUE="treasure">

<INPUT TYPE="hidden" NAME="DefaultPass" VALUE="treasure">

<P><INPUT TYPE="submit" VALUE="Log in">

<INPUT TYPE="button" VALUE="Cancel" onClick="window.close()">

</FORM>
<INPUT TYPE="IMAGE"
ALIGN="LEFT"|"RIGHT"|"TOP"|"ABSMIDDLE"|"ABSBOTTOM"|
"TEXTTOP"|"MIDDLE"|"BASELINE"|"BOTTOM"
NAME="name"
SRC="Location"
>
ALIGN specifies the alignment of the image in relation to the surrounding text. If you do not specify a value for ALIGN, Navigator uses "BOTTOM" as the default.Navigator 1.1
NAME="name" specifies the name of the input element. This value is the name portion of the name=value pair sent to the server when the form is submitted. The name is not displayed on the form. When Navigator sends the offsets of the image to the server, it sends them as name.x and name.y.
SRC="Location" specifies the URL of the image to be displayed in the document.
This example creates an image element. When the user clicks the image, the form is submitted.
<FORM>

...

<CENTER><INPUT TYPE="image" SRC="signnow.gif"></CENTER>

...

</FORM>
<INPUT TYPE="PASSWORD"
MAXLENGTH="maxChar"
NAME="passwordName" required
ONSELECT="jJScode"
SIZE="charsLength"
VALUE="textValue"
>
MAXLENGTH="maxChar" specifies the maximum number of characters a password box can accept.
NAME="passwordName" specifies the name of the input element. This value is the name portion of the name=value pair sent to the server when the form is submitted. The name is not displayed on the form.
ONSELECT="JScode" specifies JavaScript code to execute when a user selects some of the text in the text element. See the JavaScript Guide for information on event handlers.
SIZE="charsLength" specifies the length of the input field, in characters . When TYPE="text" or TYPE="password", value is the width, specified in characters, of the input field.
VALUE="textValue" specifies the initial value of the password, if any.
This example shows a password element. If the user enters a password containing more than 25 characters, the text scrolls to make room for the additional characters.
<FORM>

<B>Password:</B>

                    <INPUT TYPE="password" NAME="password" VALUE="" SIZE="25">

</FORM>
<INPUT TYPE="RADIO"
CHECKED
NAME="radioName" required
ONCLICK="JScode"
VALUE="buttonValue" required
>
textToDisplay
CHECKED indicates that the rradio button is selected. .
NAME="radioName" specifies the name of the input element. This value is the name portion of the name=value pair sent to the server when the form is submitted. The name is not displayed on the form. All radio buttons that have the same name constitute a radio group; only one radio button of a group can be set at one time.
ONCLICK="clickJScode" specifies JavaScript code to execute when a user clicks the radio button. See the JavaScript Guide for information on event handlers.
textToDisplay specifies the label to display next to the radio button.
VALUE="value" specifies the value that is returned to the server when the radio button is selected and the form is submitted. This defaults to ON.
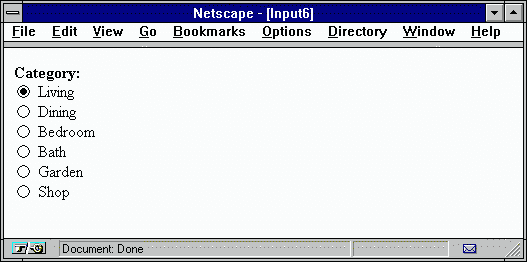
The following example creates a radio button group.
<FORM>

<B>Category:</B>

<BR><INPUT TYPE="radio" NAME="category" VALUE="liv" CHECKED> Living

<BR><INPUT TYPE="radio" NAME="category" VALUE="din"> Dining

<BR><INPUT TYPE="radio" NAME="category" VALUE="bed"> Bedroom

<BR><INPUT TYPE="radio" NAME="category" VALUE="bth"> Bath

<BR><INPUT TYPE="radio" NAME="category" VALUE="grd"> Garden

<BR><INPUT TYPE="radio" NAME="category" VALUE="shp"> Shop

</FORM>
<INPUT TYPE="RESET"
NAME="resetName" required
ONCLICK="JScode"
VALUE="buttonText"
>
NAME="resetName" specifies the name of the input element. This value is the name portion of the name=value pair sent to the server when the form is submitted. The name is not displayed on the form.
ONCLICK="JScode" specifies JavaScript code to execute when a user clicks the button. See the JavaScript Guide for information on event handlers.
VALUE="buttonText" specifies the text to display on the face of the reset button. .
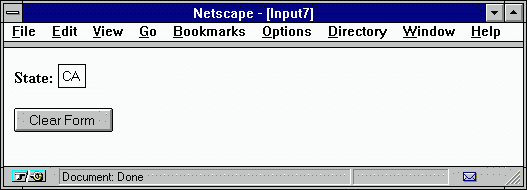
This example displays a text element with the default value "CA" and a reset button with the text "Clear Form" displayed on its face. If the user types a state abbreviation in the text element and then clicks the Clear Form button, the original value of "CA" is restored.
<FORM>

<B>State: </B><INPUT TYPE="text" NAME="state" VALUE="CA" SIZE="2">

<P><INPUT TYPE="reset" VALUE="Clear Form">

</FORM>
<INPUT TYPE="SUBMIT"
NAME="submitName" required
VALUE="buttonText"
>
NAME="submitName" specifies the name of the input element. The name is not displayed on the form.
VALUE="buttonText" specifies the text to display on the face of the submit button.
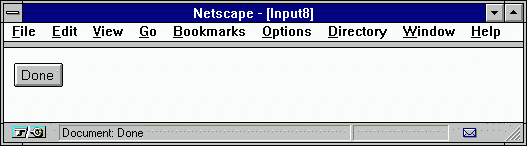
The following example creates a submit button called SubmitButton. The text "Done" is displayed on the face of the button.
<FORM>

<INPUT TYPE="submit" NAME="SubmitButton" VALUE="Done">

</FORM>
<INPUT TYPE="TEXT"
MAXLENGTH="maxChar"
NAME="textName" required
ONBLUR="blurJScode"
ONCHANGE="changeJScode"
ONFOCUS="focusJScode"
ONSELECT="JScode"
SIZE="lengthChar"
VALUE="textValue"
>
MAXLENGTH="maxChar" specifies the maximum number of characters a text box can accept.
NAME="textName" specifies the name of the input element. This value is the name portion of the name=value pair sent to the server when the form is submitted. The name is not displayed on the form.
ONBLUR="blurJScode" specifies JavaScript code to execute when the text element loses focus. See the JavaScript Guide for information on event handlers.
ONCHANGE="changeJScode" specifies JavaScript code to execute when the text element loses focus and its value has been modified. See the JavaScript Guide for information on event handlers.
ONFOCUS="focusJScode" specifies JavaScript code to execute when a user clicks the text element. See the JavaScript Guide for information on event handlers.
ONSELECT="JScode" specifies JavaScript code to execute when a user selects some of the text in the text element. See the JavaScript Guide for information on event handlers.
SIZE="lengthChar" specifies the length of the input field, in characters . When TYPE="text" or TYPE="password", value is the width, specified in characters, of the input field.
VALUE="textValue" specifies the initial value of the text element.
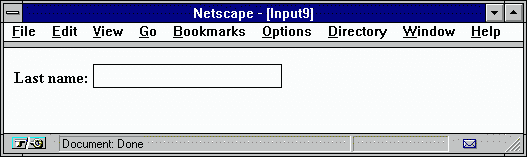
The following example creates a text element that is 25 characters long. The text field appears immediately to the right of the words "Last name:". The text field is blank when the form loads.
<FORM>

<B>Last name:</B>

<INPUT TYPE="text" NAME="last_name" VALUE="" SIZE="25">

</FORM>
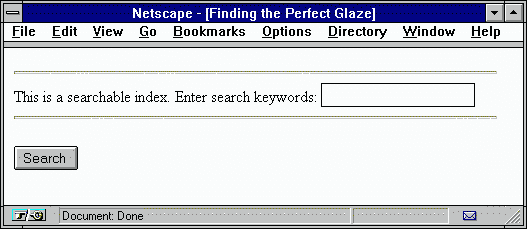
The ISINDEX tag indicates that the document has a searchable index. An HTML index document can be read and queried using a keyword search, if the server has access to a search engine. Generally, documents with the ISINDEX tag include a user interface element (such as a button) or a prompt to initiate the search. You can control the text that appears as part of the search by using the PROMPT attribute.
The keywords are passed to the server by adding a question mark to the end of the URL followed by a list of keywords separated by a plus sign. For example:
http://www.acme.com/products/index.htm?inventory+ordering+shipping
Note that ISINDEX does not require a closing tag.
PROMPT="text" specifies the text that appears as the search prompt in the browser. Navigator 1.1
The following example uses the ISINDEX tag.
<HEAD>

<ISINDEX>

<TITLE> Finding the Perfect Glaze </TITLE>

</HEAD>

<BODY>

<FORM>

<INPUT TYPE="SUBMIT" NAME="SubmitButton" VALUE="Search">

</FORM>

</BODY>
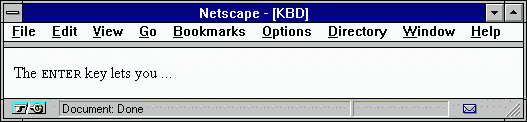
The KBD tag indicates text that is a keyboard key. Netscape Navigator displays the specified text in the current fixed-width font as determined by the font setting (Options|General Preferences).
The <KBD>ENTER</KBD> key lets you ...
The KEYGEN tag facilitates the generation of key material and submission of the public key as part of an HTML form. This mechanism is designed for use in web-based certificate management systems. It displays a menu of key-size choices from which the user must choose one. Then, when the submit button is pressed, a key pair of the selected size is generated. The private key is encrypted and stored in the local key database.
The public key and challenge string are DER encoded as PublicKeyAndChallenge, and then digitally signed with the private key to produce a SignedPublicKeyAndChallenge. The SignedPublicKeyAndChallenge is base64 encoded, and the ASCII data is finally submitted to the server as the value of a name-value pair, where the name is name as specified by the NAME attribute of the KEYGEN tag.
<KEYGEN
NAME="name" required
CHALLENGE="challenge"
>
NAME="name" specifies the name for the name-value pair.
CHALLENGE="challenge" specifies the challenge string to be packaged with the public key in the PublicKeyAndChallengefor use in verification of the form submission. If no challenge string is provided, then it is encoded as an IA5STRING of length zero.
<FORM.....>

...

<KEYGEN NAME="somekey" CHALLENGE="1125983021">

...

</FORM>
The LI tag indicates an item in a list. A single list item can contain additional paragraphs, marked with the P tag.
The LI tag does not require a closing tag.
<LI
TYPE=
"DISC"|"CIRCLE"|"SQUARE" | within
UL
"A"|"a"|"I"|"i"|"1" within
OL
VALUE="number"
>
TYPE specifies the type of symbol or numbering sequence to use before each item.
DISC specifies a solid bullet
CIRCLE specifies a hollow bullet
SQUARE specifies a square bullet
A specifies a sequence of uppercase letters
a specifies a sequence of lowercase letters
I specifies a sequence of uppercase Roman numerals
i specifies a sequence of lowercase Roman numerals
1 specifies a sequence of numbers.
VALUE="number" indicates the starting number for an item in a numbered list. This attribute is valid only in an ordered list. See "OL (ordered list)" on page 131 for information on the types of numbering available.
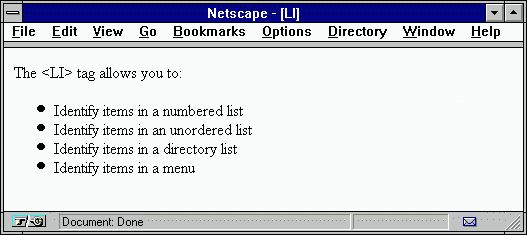
The following example defines three HTML terms. Note the use of < and > as one way to represent the less-than and greater-than characters.
The <LI> tag allows you to:<P> <UL> <LI>Identify items in a numbered list <LI>Identify items in an unordered list <LI>Identify items in a directory list <LI>Identify items in a menu </UL>
An image map is a graphic that contains hyperlinks. The image map can be divided into many regions, and each region of the map can point to a different URL. When a user clicks a specific region of the image map, Navigator loads a specific URL.
Client-side image maps are defined by the MAP and AREA tags and loaded into the Navigator as hypergraphics. When a user clicks the image, Navigator determines what URL to load based on the information in the AREA tag. The USEMAP attribute of the IMG tag specifies an image as a client-side image map.
<MAP
NAME="mapName" required
>
...
</MAP>
NAME="mapName" specifies the name of the map.
In this example, an image map is used as a toolbar
to help users navigate in a web site. The following illustration shows
what the finished image map looks like to a user: 
Each button on the toolbar is a separate region of the image map. The seven buttons correspond to regions defined by seven AREA tags. The following code defines the map:
<MAP NAME="mainmap">

          <AREA COORDS="0,0,65,24" HREF="/escapes/index.html">

          <AREA COORDS="66,0,132,24" HREF="/comprod/index.html">

          <AREA COORDS="133,0,185,24"

                    HREF="http://merchant.netscape.com/netstore/index.html"

                    TARGET="_top">

          <AREA COORDS="186,0,248,24" HREF="/newsref/index.html">

          <AREA COORDS="249,0,318,24" HREF="/assist/index.html">

          <AREA COORDS="319,0,390,24" HREF="/commun/index.html">

          <AREA COORDS="391,0,467,24" HREF="/business_solutions/index.html">

</MAP>
Because no SHAPE attribute is specified for any AREA tag, the shape of each region defaults to a rectangle. The third AREA tag uses the "_top" value for its TARGET attribute to specify that its URL is loaded into the full Navigator window.
The image used for the toolbar is nav.gif, an interlaced GIF. The IMG tag that loads nav.gif uses the USEMAP attribute to specify that the image is a client-side image map. The value of the USEMAP attribute, mainmap, is also the value used for the NAME attribute of the MAP tag. The following code associates the map with the image:
<IMG SRC="nav.gif"

          WIDTH="468" HEIGHT="25" BORDER="0"

          USEMAP="#mainmap">
Deprecated
The MENU tag defines a list of simple items, such as you would use to create a menu. This tag works just like the UL tag. The items should be short, no longer than one line. Each is begun by the <LI> tag.
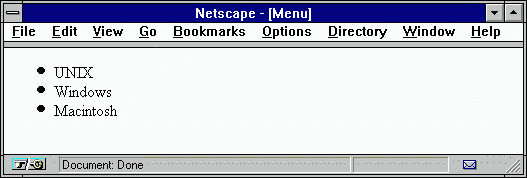
The following example creates a simple menu.
Netscape Navigator supports these platforms:
<MENU>

<LI> UNIX

<LI> Windows

<LI> Macintosh

</MENU>
The META tag specifies meta-document information or creates an HTTP response header. The META tag provides a way to store information about the document that is not available elsewhere in the document. For example, the META tag can contain catalog, author, or index information that various search engines can use.
The META tag creates a special HTTP response header that the server sends to the client before transmitting the HTML document. This form of the META syntax is frequently used to implement client pull.
When you create an HTTP header with META, do not override a response header field that is normally returned by the server. Use META to create a special response header field, such as a "refresh" field that implements client pull.
<META
CONTENT="value" required
HTTP-EQUIV="FieldName"
NAME="name"
>
CONTENT="FieldContent" specifies the value of the HTTP response header field created by HTTP-EQUIV.Navigator 1.1
HTTP-EQUIV="FieldName" specifies the name of the HTTP response header field.
NAME="name" specifies a name for the meta-document information. Different programs that access meta-document information expect different values for this attribute
Example 1: indexing information
In this example, the META tag stores indexing information that a search engine uses when it accesses the document. This search engine expects the NAME attribute to have a value of "keywords" when a document is indexed. Search utilities and some webcrawlers used by web search servers will catalog this information. The index keywords are stored as the value of the CONTENT attribute.
<HEAD>

<TITLE>HTML Reference</TITLE>

<META NAME="keywords"

          CONTENT="HTML documentation reference Netscape">

</HEAD>
This document is indexed under the terms "HTML", "documentation", "reference", and "Netscape".
Example 2: a special HTTP header
In this example, the META tag creates a special HTTP header field called "Creation_Date". This field is returned by the server when an HTTP connection for this document is established.
<HEAD>

          <META NAME="Creation_Date" CONTENT="July 17, 1995 19:24:00">

</HEAD>
This example creates the following HTTP header field:
Creation_Date: July 17, 1995 19:24:00
In this example, the META tag creates a special HTTP header field that implements a client pull animation. The animation shows three different views of a dog; these views, when loaded sequentially, simulate the dog running. The CONTENT attribute specifies that each view of the dog is displayed for three seconds.
When a user loads spot1.html, the file is displayed for three seconds. Then the second file, spot2.html is loaded. After three more seconds elapse, spot3.html is loaded by the browser. The following code is contained in a file called spot1.html:
<HEAD>

<TITLE>See Spot Run</TITLE>

<META NAME="refresh"

          CONTENT="3,URL='http://www.homepage.com/spot2.html'">

</HEAD>


<BODY>

<IMG SRC="spot1.gif">

</BODY>
The file spot2.html contains the following information:
<HEAD>

<TITLE>See Spot Run</TITLE>

<META NAME="refresh"

          CONTENT="3;URL='http://www.homepage.com/spot3.html'">

</HEAD>

<BODY>

<IMG SRC="spot2.gif">

</BODY>
Similarly, the file spot3.html contains a reference to spot3.gif within an IMG tag.
Tag reference list Part 3Go to Tag reference section, Part 3