Manage templates from the 'Create Templates' option in the Personal Menu. In this section the user can manage their own templates to use them later as a draft when writing a request. The user can also view all the global templates.
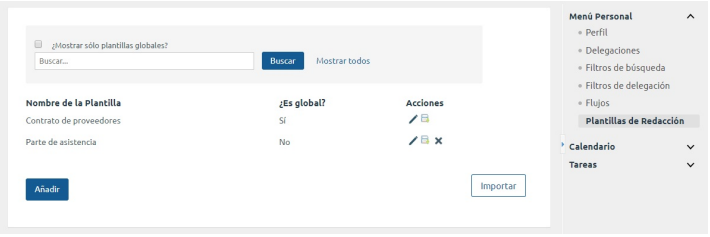
A list of all the available templates is first displayed with some filters:
- Show only global templates. It displays only global templates in the list. If this filter is not applied, all available templates (global and shared) will be displayed.
- Search. Search for templates by entering a text in the box.
- Edit existing templates. Notice that in case of not having editing permissions on the template to be edited, the template will be accessed in read mode.
- Export existing templates. Download templates to import them in the future, either for you or for any other user.
- Delete existing templates. Notice the template will be deleted for all users who have shared it. This option is not available when having no editing permissions on the template to be deleted.
- Add new templates. Add new templates to use them when writing a request.
- Import templates. Import templates from a .json file.
By clicking on the 'Add' button from the main view of Editorial Templates, access to the form to add a new template to your collection. This form will be the same as the one for creating a template.
The fields to fill in are practically the same as when writing a request, but naming the template and having editing permissions (at least one of the users who share it) are required. The following are the fields:
- Template name: required.
- Global use template: allows you to set the template as a global template, so that it is shared with all users of the system. This option is only available to administrators.
- Recipients: addressees to whom the request will be addressed. Click on 'Flow Preview' to get a better view of them.
- Addressees of internal communication: users who may be notified of the result of the request when it is finalised.
- Subject: request subject.
- Reference: to give a reference for the request.
- Types of access to the signature authentication: how you want the users to access (Unavailable, Public access, User/Password, Certificate, Private).
- Message: message of the request.
- Types of signature supported: All, Biometric signature and certificate, Certificate and signature through sms, Only with digital certificate.
- Signature stamp: type of signature stamp. It can also be sent without a stamp.
- Signing policy: if you have defined different signing policies in the system, select for the request.
- Metadata: fill in and/or add fields to the request.
- Send automatic reminders to recipients: decide whether to send automatic reminders to the recipients of the request or not.
- As the sender, decide if you wish to receive notifications of the actions related to the request.
- Users/Groups/Occupation cluster able to share the template: decide which users/groups/occupation cluster share the template and if they have editing permissions on it. Permissions can be modified by clicking on the pen icon. If we don't want a user/group/occupation cluster to share the template we click on the X icon.
Click on 'Assign' to associate new users/groups/occupation cluster to the template. To select the users/groups/occupation cluster you can search for them, then check and choose if you want them to be able to edit the template and click on 'Assign'.